Choosing the right Helideck Safety Net is not a cosmetic decision. It is a frontline control for personnel, equipment, and aircraft operations around an exposed landing area. A weak fit can create trip hazards, snag points, or unsafe gaps near the deck edge.
Industry guidance provides a practical starting point. The UK Civil Aviation Authority’s CAP 437, Standards for Offshore Helicopter Landing Areas, addresses helideck design, perimeter protection, net positioning, and inspection expectations. The International Association of Oil & Gas Producers also reports aviation safety performance through its annual Safety Performance Indicators. These sources show why equipment selection must reflect operational risk, not simply purchase price.
The right net should match deck dimensions, helicopter activity, weather exposure, drainage needs, and emergency procedures. Material strength matters. So do mesh size, fixing points, UV resistance, flame behavior, and corrosion performance. A net that looks secure during a calm inspection may behave differently under wind, salt spray, or repeated foot traffic. That detail is easy to underestimate.
A neat-looking net can still be wrong.
These seven tips examine how to compare specifications, verify certification, assess installation quality, and plan inspections. They also consider maintenance records and crew usability, because a product is only effective when people can deploy and trust it. Some recommendations may appear cautious. That is deliberate. Standards evolve, site conditions differ, and no single Helideck Safety Net suits every installation. Operators should confirm final decisions with competent aviation, structural, and safety professionals.
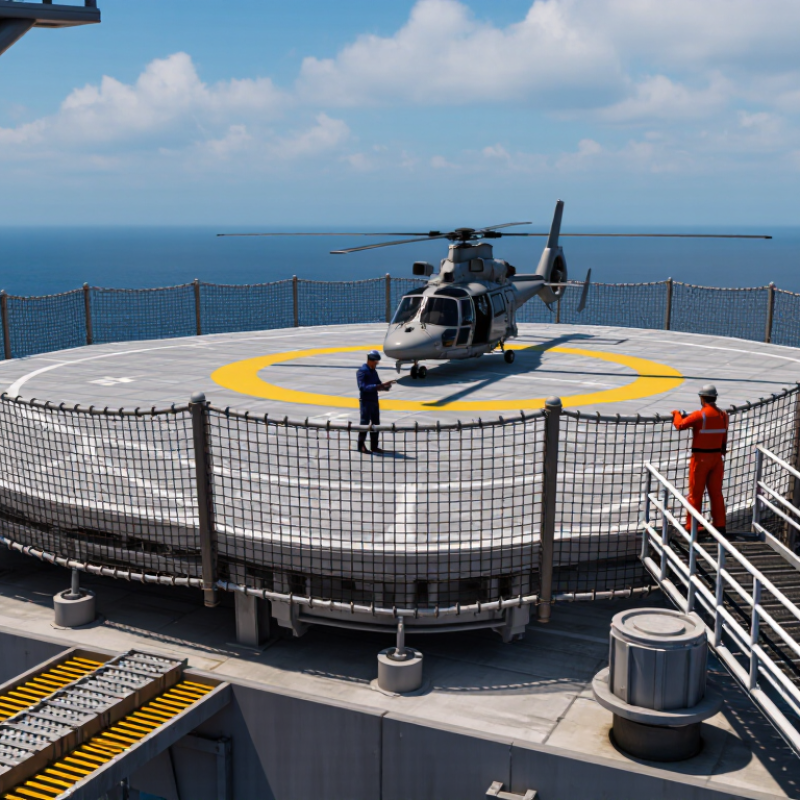
CAP 437 identifies a minimum 1.5 m net projection beyond the helideck edge. This distance helps define the fall zone around the landing area. Measure it horizontally from the deck boundary, not from a nearby rail or support frame. A smaller projection can leave exposed gaps where a person may fall. That risk becomes serious during rain, darkness, or emergency movement.
Measure carefully.
The net should remain continuous around the usable perimeter, while allowing safe access points and clear drainage. Its supporting structure must resist expected loads without creating sharp edges or trip hazards. Check the net’s height, tension, attachment points, and condition during each inspection. UV exposure, salt spray, fuel contamination, and repeated foot contact can weaken materials over time.
A neat drawing is not enough. During practical checks, crews should inspect corners, joints, and areas beneath the net. These locations often collect water or hide loose fittings. The 1.5 m requirement is a minimum, not a universal design solution. Local conditions may justify a wider projection or additional protection. Designers should confirm the current CAP 437 edition and applicable aviation requirements before installation. Even experienced teams can overlook a measurement when deck markings are faded or the perimeter is irregular.
Choosing a helideck safety net is mainly a geometry decision. CAP 437 recommends keeping the net within a 10° outward slope. That angle helps reduce trip hazards and supports safer access around the deck edge. A net that tilts inward can obstruct movement and create a dangerous catch point.
Measure the deck perimeter before selecting materials. Check the distance from the deck edge to the outer net frame, then verify the slope at several locations. Do not rely on one measurement. Steelwork, drainage channels, and uneven supports can change the angle by a few degrees. Small errors matter. A simple digital inclinometer can reveal problems that drawings miss.
Use a clear installation drawing with slope lines, fixing points, and edge clearances. Keep the net evenly tensioned, but avoid excessive tension that distorts its geometry. Inspect corner sections carefully; they often pull tighter than straight runs. Confirm that clamps, posts, and fasteners do not project above the walking surface. Record measurements during installation, then repeat them after maintenance or heavy weather. Site conditions can change. During inspections, look for sagging mesh, loose connections, corrosion, and damaged edge protection. One detail is easy to overlook: a compliant angle can still fail if the net is poorly supported. A competent safety professional should review the final arrangement against CAP 437 and applicable local requirements.
A reliable helideck safety net starts with its mesh design. Choose openings smaller than the smallest boot sole likely to cross the deck. This reduces foot-trap hazards during landing, refueling, or emergency movement. Keep the mesh surface level with the surrounding structure. Raised edges can catch boots, wheels, and equipment. Small gaps matter.
Examine dropped-object control closely. Mesh should retain loose tools, fasteners, and fragments without creating sharp projections. Select wire thickness and panel strength according to the deck’s operational load assessment. Check the perimeter cable, clips, and anchor points as one system. Weak connections can defeat strong mesh. Use corrosion-resistant materials suited to salt spray, fuel residue, and frequent washing. Drainage should remain open, so water does not pool beneath the net.
Ask for documented testing, installation guidance, and inspection intervals. Competent safety personnel should verify the design against current aviation and offshore requirements. During inspections, look for broken wires, enlarged openings, flattened mesh, and loose fixings. A simple boot test may reveal a snag that drawings miss. Do not rely on appearance alone. I have found that “almost tight” panels often need adjustment sooner than expected. This is an area worth reconsidering after harsh weather. Record findings with photographs and clear repair limits. A practical design protects feet without becoming another dropped-object source.
Offshore helideck safety nets face sunlight, salt spray, fuel residues, and sudden heat. Material selection must address all four risks.
The UK Civil Aviation Authority’s CAP 437 guidance specifies a perimeter safety net with a minimum width of 1.5 metres. That dimension matters when personnel move quickly near a wet deck edge. A narrow or poorly tensioned net may offer false confidence.
Specify UV-stabilised rope or coated metal mesh, supported by documented weathering tests such as ISO 4892-3. Saltwater exposure also demands corrosion-resistant fittings, preferably with test evidence from salt-spray procedures such as ISO 9227.
The net itself may survive while clips, bolts, or cable eyes deteriorate first. Inspect hidden contact points. They are easy to miss. Fire performance deserves equal attention. CAP 437 requires suitable fire-resistant characteristics for helideck safety equipment, while the IMO FTP Code provides recognised fire-test principles for marine materials. Request certificates for flame spread, ignition resistance, and smoke performance, not vague “fireproof” claims.
The IATA 2024 Safety Report recorded 40.6 million commercial flights and 46 accidents worldwide, showing why small safety details remain operationally important. Offshore exposure is different, but the lesson is similar: reliability depends on the complete system.
Replace damaged strands early, record UV fading, and recheck tension after storms. No material remains perfect forever. Salt can hide inside fittings. Misjudging that detail could be costly.
7 Tips for Choosing the Right Helideck Safety Net
Verify the design against ICAO Annex 14, Volume II, and the latest local aviation rules. ICAO requires helideck protection that reduces fall risk without obstructing helicopter operations. Check the net’s width, clearance, edge attachment, and drainage path. UK CAA CAP 437 guidance commonly uses a 1.5-metre safety-net extension beyond the deck edge. Confirm the selected system matches the applicable edition, not an old tender document.
Demand documented load testing. Ask for test dates, test loads, calibrated equipment, and signed results. A certificate without traceable records is weak evidence. Review rope condition, mesh damage, corrosion, fasteners, and anchor points. Schedule inspections after severe weather, impact, modification, or unusual loading. Keep photographs with each inspection record. Shortcuts become expensive.
Use a competent inspector familiar with offshore or rooftop helidecks. Compare reports with ICAO Annex 14 and CAP 437 recommendations. Check whether the net remains correctly tensioned and does not rise into the flight path. Review inspection intervals, replacement limits, and emergency access arrangements. Also examine the manufacturer’s installation instructions, even when no brand is involved. In practice, paperwork can look perfect while one corroded anchor remains unnoticed. That deserves a second review. Industry safety reports repeatedly show that weak maintenance controls contribute to repeat findings, although published datasets rarely isolate safety-net failures. A sensible procurement file should therefore include the standard, test evidence, inspection history, and responsible person.
Practical selection criteria for elevated helideck perimeter safety nets
| Tip | Selection Dimension | What to Verify | Recommended Evidence | Acceptance Considerations | Inspection or Review Trigger |
|---|---|---|---|---|---|
| 1 | Regulatory and design compliance | Confirm that the safety net arrangement is suitable for the helideck geometry, operating environment, and applicable aviation regulations. Check alignment with the current edition adopted by the local aviation authority of ICAO Annex 14, Volume II — Heliports, together with national requirements and the approved helideck design. | Approved drawings, compliance matrix, project specifications, and written confirmation from the responsible aviation or engineering authority. | Do not rely on a generic “ICAO compliant” claim. The installation should be assessed against the exact helideck type, elevation, perimeter configuration, and jurisdiction. | At design approval, after regulatory changes, and whenever the helideck layout or operating limitations change. |
| 2 | Load capacity and load testing | Verify the net, support cables, brackets, fasteners, and anchors as a complete load path. Testing should reflect the specified design loads and the credible loads identified by the structural engineer, such as a person falling against the net or equipment impact. | Certified material data, structural calculations, installation records, and independent load-test reports that identify the test method, test load, test location, duration, deflection, and results. | There is no universal load value that applies to every helideck. Acceptance limits must come from the approved design, applicable regulations, and engineering assessment. A certificate for the net fabric alone is not sufficient. | Before first use, after installation or major repair, after an overload event, and whenever corrosion or structural movement is suspected. |
| 3 | Material durability and environmental resistance | Evaluate resistance to ultraviolet exposure, salt spray, moisture, temperature variation, fuel and hydraulic-fluid contamination, abrasion, and corrosion. Check compatibility between the net, cables, fittings, deck structure, and protective coatings. | Material specifications, corrosion-resistance information, UV-aging data where applicable, coating records, and an environmental suitability statement. | Select materials appropriate to the installation environment. On offshore or coastal helidecks, pay particular attention to galvanic corrosion, salt accumulation, and deterioration at connectors. | During every routine inspection, after severe weather, after chemical contamination, and before the expected service life is exceeded. |
| 4 | Geometry, clearance, and integration | Check that the net provides the required perimeter coverage without reducing required helicopter landing-area clearances, obstructing visual cues, interfering with lighting or firefighting equipment, or creating snagging and trip hazards. | As-built drawings, dimensional inspection records, photographs, and a verification survey of the net perimeter, attachment points, and adjacent equipment. | The net should be correctly tensioned and securely restrained. It must not sag into unsafe areas, block access routes, interfere with drainage, or create loose projections that could catch clothing or equipment. | After installation, deck modification, equipment relocation, heavy maintenance, or any event that could alter net tension or alignment. |
| 5 | Inspection and maintenance program | Establish documented checks for broken or cut strands, loose stitching, frayed edges, damaged clips, corrosion, missing fasteners, excessive slack, deformation, contamination, and deterioration of anchor points. | Inspection checklist, defect photographs, maintenance log, corrective-action records, and sign-off by a competent person familiar with helideck safety systems. | Inspection frequency should be based on the risk assessment, manufacturer or designer instructions, local authority requirements, and exposure conditions. A visual check should not replace an engineering examination when structural damage is suspected. | Before operational use where required by the operating procedure, at scheduled intervals, after storms or abnormal events, and following reported damage. |
| 6 | Installation quality and attachment integrity | Confirm correct installation of perimeter cables, shackles, clamps, brackets, anchor bolts, welds, and termination points. Verify torque, locking arrangements, weld quality, and protection against loosening or unintended release. | Installer qualifications, installation method statement, torque records, weld inspection documents where relevant, as-built records, and completion inspection. | The complete assembly should transfer loads safely into the supporting structure. Any field change should be reviewed by the responsible designer or engineer before acceptance. | During commissioning, after structural repairs, after repeated high loading, and when loose fittings, cracking, movement, or unusual vibration is observed. |
| 7 | Traceability, records, and replacement planning | Ensure every net section and major component can be identified and linked to its inspection, test, repair, and replacement history. Define removal criteria for damage, ageing, failed tests, or loss of required performance. | Asset register, component identification, certificates, inspection history, load-test records, repair records, service-life guidance, and approved replacement specifications. | Replace components when their condition or test results no longer demonstrate safe performance. Replacement parts should match the approved design; substitutions require technical review and documented approval. | At each audit, after failed or inconclusive testing, when traceability is lost, and before the planned service-life limit is reached. |
Choose openings smaller than the smallest boot sole crossing the deck. Small gaps matter. This reduces foot-trap risks during landing or refueling.
No. Keep it level with nearby structures. Raised edges can catch boots, wheels, and loose equipment during sudden movement.
Select mesh that retains tools, fasteners, and fragments without sharp projections. Check the mesh, cables, clips, and anchors together. One weak connection can defeat strong mesh.
Use UV-stabilised rope or corrosion-resistant coated mesh. Fittings should resist saltwater, fuel residue, washing, and harsh sunlight. Salt can hide inside fittings.
Request documented results for flame spread, ignition resistance, and smoke performance. Avoid vague “fireproof” claims. Certificates should identify the tested material.
Many offshore guidelines reference a 1.5-metre extension beyond the deck edge. Confirm the current local requirement. Width alone cannot correct poor tension or damaged anchors.
Ask for load-test dates, test loads, calibrated equipment, signed results, and installation guidance. A certificate without traceable records is weak evidence.
Inspect at planned intervals and after storms, impacts, modifications, or unusual loading. Look for broken wires, enlarged openings, flattened mesh, corrosion, and loose fixings.
No. Appearance can mislead. A simple boot test may reveal snagging that drawings miss. I have found “almost tight” panels need adjustment sooner than expected.
Record photographs, defects, repair limits, tension checks, and the responsible inspector. Reconsider the design after severe weather. Paperwork can look perfect while an anchor quietly deteriorates.
Choosing the right Helideck Safety Net is essential for protecting personnel and supporting safe helicopter operations. Begin by defining the fall zone and ensuring the net extends at least 1.5 meters beyond the helideck edge, in line with CAP 437 guidance. Its geometry should also be controlled, with an outward slope of no more than the recommended 10 degrees to provide effective support without creating unnecessary hazards.
Mesh design is equally important. Select openings that reduce foot-trap risks while limiting the chance of small objects falling through the net. For offshore installations, materials should resist ultraviolet exposure, saltwater corrosion, and fire. Finally, confirm that the system has documented load-testing results, clear inspection procedures, and suitable maintenance records. Reviewing the installation against relevant CAP 437 requirements and ICAO Annex 14 provisions can help ensure the Helideck Safety Net remains dependable throughout its service life.

LvXing